httpdサーバをインストールしよう

在宅ワークで、2日毎に1時間の有酸素運動ジョギング1週毎に10Kmジョギング無理せず継続中!
さぁ、今回はここまで準備してきたVirtual Box内の開発用CentOS仮想マシンにホームページの元祖httpdをインストールしてみます。
●今回インストールするhttpdサーバ「Apache」の情報を確認します。
$ dnf info httpd
バージョン : 2.4.37
●「Apache」をインストールします。「root」権限の必要なコマンドなので先頭に「sudo」をつけます。
$ sudo dnf install httpd httpd-tools httpd-devel httpd-manual
●インストールされた「Apache」を確認します。
$ dnf list installed httpd*
●自動起動となっているか確認します。
$ systemctl is-enabled httpd
●自動起動するよう設定します。
$ sudo systemctl enable httpd
●設定ファイルを文法チェックします。
$ apachectl configtest
デフォルトのままでは下記のように「ServerName」が設定されていない旨の警告が出ているので直します。
AH00558: httpd: Could not reliably determine the server’s fully qualified domain name, using localhost.localdomain. Set the ‘ServerName’ directive globally to suppress this message
Syntax OK
Syntax OK
●設定ファイルを「httpd.conf.org」としてバックアップします。
$ sudo mv /etc/httpd/conf/httpd.conf /etc/httpd/conf/httpd.conf.org
●設定ファイルを「httpd.conf.org」から複製します。
$ sudo cp /etc/httpd/conf/httpd.conf.org /etc/httpd/conf/httpd.conf
●設定ファイルを編集します。viエディタの使い方はこちらに投稿しているので参考にしてください。
$ sudo vi /etc/httpd/conf/httpd.conf
次のように98行目あたりの「ServerName」について
#ServerName www.example.com:80
のコメントアウトを外し
ServerName localhost.localdomain:80
に変更して保存します。設定ファイルを編集したら必ず文法チェックします。
Syntax OK
となったら「Apache」を再起動します。
$ sudo systemctl restart httpd
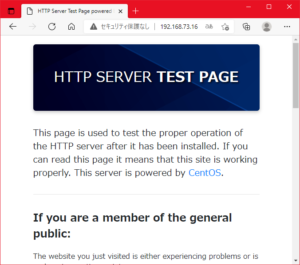
 ブラウザで「http://IPアドレス/」を見ることが出来るはずです。
どうですか、このように見えましたか?
Good job!
無料相談受付中
お気軽にご相談ください
TEL: 03-5289-7687
9:00~17:00(土日祝除く)


